Fish Sauce Dipping Sauce – Nuoc Mam

Here’s how to make fish sauce dipping sauce, Nuoc Mam:

1-2 t honey or palm sugar

1 T hot or warm water – mix the honey or sugar until mostly dissolved

Add 2 T good quality fish sauce

1 clove of garlic, smashed or minced

and the juice of 1-2 limes.

Add crushed or sliced serrano or Thai chili to the sauce or serve on the side.

(or replace the chilies and garlic with Sriracha chili garlic sauce if you want a short cut)

You can water it down with another 1-2 T of water if you prefer, or want to stretch it out.

Let the dressing sit while you finish other things – it is better if it has some time.

Give each person a tiny dipping bowl and distribute.

Great for dipping Summer Rolls or Spring rolls. Also great as a sauce for eggs or grilled pork, as is popular in Vietnam. This is also the base dressing for Vietnamese Chicken and Cabbage Salad.

Posted in Recipes, Side dishes | Tagged | Comments closed

Moxa Season – Time to Build Qi and Blood

3 February 2021 is the beginning of Spring Moxa Season, which lasts about 4 weeks, with the peak being Chinese Lunar New Year, which is Feb 12 this year. During this time the “Life Gate” is open and illness can invade more deeply than at other times of year. This is also the time when moxibustion (moxa for short) can penetrate more deeply than usual into the “Life Gate” or Ming Men (aka Lower Dan Tien or inside the lower belly) because is open at this time. This is great for preventing illness.

Moxa strengthens the constitution and immune system, builds Qi and Blood, increases the energy and circulation of the whole body, can help pain due to cold and damp, and can soften lumps!

Moxibustion is a Chinese herb called mugwort (Ai Ye, Artemisia Vulgaris) that we use to warm certain points or areas of the body in order to warm and strengthen the Qi there. Common areas where moxa is applied to strengthen the Kidney energy and build the Qi are the low belly (Ren 4 and 6) and low back (Du 4 and UB 23) or the Stomach 36 point on the leg.moxibustion-therapy

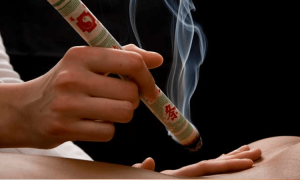
There are very many preparations of moxa, and ways that it is used – directly on the skin as in Japanese (okyu or chinetkyu) moxa cones, or indirectly, as in a moxa stick held near the skin. Moxa sticks can be a traditional moxa sticky, which is smoky (see photo) or modern smokeless moxa sticks. Loose moxa can be used in a moxa pot on put on the belly or back. Also, either loose moxa cones or specialty smokeless moxa can be used on the top of the needle during an acupuncture treatment.

My two latest favorite ways to utilize moxa are with the moxa heat pack, which is self-heating and can be easily applied to the low belly or low back when you are resting at home, or on areas of soreness that benefit from warmth. Read more about the convenient moxa heat packs on my blogself-heating-moxa-packs-moxibustion-helio-medical-supply

The second way is Ontake, (Moxa in Motion), which is a cross between a moxa treatment and massage of the acupuncture channels. In this super cool technique, moxa is pressed into a section of bamboo and used like a massage tool on the skin. I’ll be writing more about that next!

Moxibustion is a traditional therapy that has always been used along with acupuncture; acupuncture in Chinese is actually acupuncture and moxibustion, Zhen Jiu. The earliest acupuncture and moxibustion texts books date back to the Han Dynasty in the 2nd century BCE, and there is evidence in the form of hieroglyphics that these modalities were being used together even further back (Shang Dynasty, 1600-1100 BCE). This ancient modality still remains an integral part of Traditional East Asian Medicine.


Posted in Healthful Living, Traditional East Asian Medicine | Comments closed

Clean and Clean Gut by Alejandro Junger

A great resource for cleansing is Dr. Alejandro Junger’s book,  Clean: The Revolutionary Program to Restore the Body’s Natural Ability to Heal Itself. His book is quite readable and interesting. The three week cleanse he suggests is reasonably easy to follow. He recommends eating two liquid meals and one solid meal each day. Depending on the weather, your activity level and your constitution, you may want to try one liquid and two solid meals. That’s what I am doing this year.

Dr Junger also has another book called Clean Gut: The Breakthrough Plan for Eliminateing the Root Cause of Disease and Revolutionalizing your Health

I have done many cleanses over the years and this is the one I go back to. My Nourishing Winter Cleanse is quite similar to this, so if you want to understand more of the science behind our health and food, this is a great read.

Posted in Healthful Eating | Tagged | Comments closed

Moxa Heat Packs (self heating)

Moxibustion is a warming technique that has always been an integral part of the practice acupuncture. Traditional self-heating-moxa-packs-moxibustion-helio-medical-supplymoxibustion is smoky, which makes it hard to use indoors. The moxa heat pack, on the other hand, is not smoky at all and is so easy to use, as well as effective. My clients are LOVING it!

Moxa deeply warms the body and strengthens the kidneys when applied to the low back or belly. In Traditional East Asian medicine, the kidney energy is known as the Ming Men Fire, which is the essential modal force of the body. It is likened to the fire under a cooking pot, where the cooking pot is analogous to the digestive tract. If the fire it too low, not only will your soup not be cooked, but the steam will not fill your kitchen. The steam is your Qi and blood which needs the Ming Men fire to activate and circulate it. You can see why the Ming Men Fire is so important.

Placing the moxa heat pack on your low belly or low back will revitalize your Ming Men Fire.  Moxa can also be used in other areas, too.

Moxa tonifies and strengthens the constitution and immune system, builds Qi and Blood, increases the energy and circulation of the whole body, can help pain due to cold and damp, and can soften lumps! Wow!

Instructions to activate and store moxa heat pack:

Remove from package and activate by working and moving it in all four directions on and off until it gets warm. It will take about 20 minutes to warm up.

When you are done using it, put it in a jar and close the lid. This will extinguish the heat. Next time you want to use it, take it out of the jar and activate it as you did initially. It will take about 20 minutes to warm up.

You will get at total of 15-20 hours of warmth with each moxa heat pack initially.

Once it is not heating up anymore, you can use the microwave for 10-15 seconds, then activate the moxa heat pack as you did before. It takes 8-10 minutes to warm up. You can zap it in the microwave up 20 more times before it totally loses its heat power!

Caution:

Do not put directly on your skin, but either on top of clothes, or ideally, wrapped in a hand towel, in a wool sock or homemade moxa pouch. The reason for this is that the outer package contains plastic (phthalates), which we don’t want to absorb into our body through our skin.

Do not sleep with moxa heat pack. These can get really hot and there is a danger of being burned if you bring them to bed with you.

Where to apply your moxa heat pack:

On your lower belly – between your pubic bone and navel on Ren 4 – 6.

On your lower back, above your waist on either side of your lower back on UB 23 in the area of the kidneys, and/or on Du 4 on the midline in your lumbar spine. You can move it up and down as you like on your lower belly and/or your lower back You can use it for as long as you like, typically for 20 minutes to an hour or two If it gets too hot, take it off, or use more cloth between you and the moxa heat pack.

Alternate between your low belly and low back. You can use two at once, one on either side of your low back in the kidney area – or one on your low belly and one on the midline of your low back.

Your practitioner may recommend other points specially for you to use the heat pack on, such as point on the leg like Stomach 36 or Sp 6, or upper back points. You can put two moxa heat packs in one long sock – or in two separate socks that you tie together – then drape them to get to the points you want.

Available at my office, moxa heat packs are $4.00 each. You find buy them online in a box of 10.


Posted in Moxibustion, Traditional East Asian Medicine | Comments closed

White Chicken Chili

This delicious, nutritious pulled chicken with coconut milk that can be done on the stovetop or in a slow cooker. It is a bean-free vegetable chili, has 28 g of protein per serving, calls for bone broth and is appropriate for a cleanse (Whole30, Clean) or paleo diet. This is based on The Real Food Dietitians’ recipe.

It’s super quick and I dish some out for my kid before I add the coconut milk in, since he likes it better without coconut milk or spice.

Ingredients

  •  1 ½ lb. Boneless, skinless chicken breasts and/or thighs
  • 1 T ghee or olive oil (for stovetop only)
  • 1 medium onion
  • 2 stalks celery
  • 2 medium carrots
  • 1 medium bell pepper, any color, and/or 1-2 jalapeno or other fresh hot chili – omit if avoiding nightshades
  • 6 cloves garlic, minced
  • 2 ½ t ground cumin
  • 1 t dried oregano
  • 1 T chili powder
  • 1 t salt, plus more to taste
  • ½ t black pepper – omit if avoiding nightshades
  • 1 or 2 cups organic bone broth, chicken or beef
  • 1 14-ounce can of tomato puree or diced tomatoes – omit if avoiding nightshades
  • 1 bunch kale, chopped fairly small
  • 1 14-ounce can full-fat coconut milk
  • Juice of 1 lime
  • ½ cup fresh cilantro, chopped
  • Fresh cilantro and lime wedges for garnish, optional
  • Avocado, diced, optional
  • Chili sauce or diced fresh chilies to taste – omit if avoiding nightshades

T = tablespoon
t = teaspoon

Slow Cooker Instructions

Dice or mince vegetables – onions, celery, carrots, peppers (if using), garlic and toss into slow cooker.

Mix cumin, oregano, chili powder, salt, and pepper and sprinkle half of the spice mix on the veggies and stir to combine.

Arrange chicken on top of vegetables in a single layer at the bottom of a slow cooker and sprinkle the second half of the spice mix on top of the chicken.

Add just enough broth to barely cover the chicken and place lid on slow cooker.

Set heat to LOW and cook 6-7 hours or until chicken is done.

Remove chicken from slow cooker and shred with two forks. Add kale and tomatoes (if using), and return chicken to slow cooker. Cook for around 15-20 minutes.

Add coconut milk, stir and replace lid. Continue heating an additional 10 minutes or until soup is heated through.

Stir in lime juice and cilantro. Taste and adjust seasonings as desired.

Serve in bowls garnished with diced avocado, diced chilies and lime wedges, if desired.


Stovetop Instructions

Place a large Dutch oven (saucepan with lid) over medium heat. Add 1 T ghee or coconut oil and allow to melt. When ghee just starts to shimmer, add onions and sauté 2-3 minutes, stirring occasionally, add celery, carrots, and peppers (if using) until they start to soften.

Add garlic, cumin, oregano, (chili powder), salt, and (black pepper). Continue to cook an additional 30-60 seconds or until fragrant.

Lay chicken in the pan over the onion and pepper mixture. Add 1 cup of broth and bring just to a boil. Reduce heat, cover and simmer for 15- 20 minutes or until chicken is cooked through. Shred the chicken in the pan using two forks or transfer it to a cutting board to shred before returning it to the pan.

Add the kale and the can of tomatoes (if using, otherwise add the second cup of broth) to the Dutch oven and return to a low simmer. Cover pan and allow chili to simmer for 20-30 minutes, or longer, up to an hour. Add the coconut milk in the last 5 minutes of the simmer. Do not boil.

Remove from heat and stir in lime juice and cilantro. Taste and adjust seasonings as desired.

Serve in bowls garnished with diced avocado, diced chilies and lime wedges, if desired.

You can read about bone broth on my blog, and/or check out these bone broth recipes:

The Real Food RD’s bone broth recipe

Dr. Cate’s video – how to make beef bone broth


Posted in Uncategorized | Comments closed

Acupuncture Medicine Day


October 24, 2020 has been officially declared Acupuncture Medicine Day in the State of Vermont. You can view actual the proclamation here. Acupuncture Medicine Day has a website.


State of Vermont

Executive Department

A Proclamation

WHEREAS,    acupuncture medicine has a long and rich history as components of a comprehensive traditional medical system that has been used for thousands of years to diagnose and treat illness, prevent disease, and improve well-being; and

WHEREAS,    practitioners of acupuncture medicine are dedicated to the highest standards of professionalism and maintain these standards through education, credentialing, and a personal commitment; and

WHEREAS,    millions of Americans seek the services of acupuncturists each year; and

WHEREAS,    it is vital that those in need of medical services understand the full realm of available modalities and seek competent and professional care.

NOW, THEREFORE,    I, Philip B. Scott, Governor, hereby proclaim October 24, 2020 as

ACUPUNCTURE MEDICINE DAY

in Vermont and I encourage all Vermonters to learn more about the potential benefits of acupuncture medicine.

Given under my hand and the Great Seal of the State of Vermont on this 17th day of September, A.D. 2020.


Philip B. Scott

Governor


Brittney L. Wilson

Secretary of Civil and Military Affairs

Posted in Newsletter | Comments closed

Laraway Mountain – the secret is out!

IMG_1211 2

Laraway Mountain, Waterville, VT

4 mile hike round trip to lookout, about 3 hours, 1500 ft elevation gain, summit 2700 ft

I have been doing a decent amount of hiking this fall, and I am particularly loving Laraway Mountain. My friends call me obsessed! There’s enough elevation gain to give my legs a good work out, but it doesn’t take all day.

Even though it is along the Long Trail, there are very few people there. It’s kind of a secret spot. This little know spot boasts lots of natural features, including awesome rocks, waterfalls if it’s recently rained, and beautiful streams, and there is a look out at the top with a view of Mt Mansfield.

IMG_1075

It’s about an hour away and the whole thing takes me about 3 hours to hike the 4 miles round trip to the lookout. The summit is .4 miles past the lookout, but honestly, that part is not particularly special; it is pretty flat and was muddy when I did it.

This fall the leaves make it a bit hard to find the trail, so keep an eye out for white blazes. Wear water resistant shoes with good tread, there are several stream crossings, and some mud. The trailhead is not super easy to find, either.

To find the trailhead, head up 15 to Jeffersonville, at the roundabout turn left onto 108 then the first right on 109. After 5 or 10 minutes you will see Montgomery

Covered Bridge on the right, then the next right is Codding Hollow Road and there will be another covered bridge. Follow that road (there will be little signs at the forks to keep you heading toward the Long Trail trailhead).

Tip: Take a screen shot of the map on your phone – there is very little service out there!

There are two parking lots, the first one on the right seems to be the main one. If you have AWD and/or some clearance, you can continue straight down the dirt road (path might be the more appropriate word) and you will come to the second parking lot on the left a about a quarter mile. If you don’t drive it, you will be walking it to the trail head. IMG_1208


Posted in Healthful Living | Comments closed

Chinese Herbal Flower Garden

IMG_0948 copy

A Monarch butterfly came by as I was taking photos to share with you. I’ve been working on the landscaping around my office all summer and the gardens are looking beautiful.

I’ve been planting Chinese herbal medicinal plants, including Peony, Black Cohosh, Skullcap, Wild Rose, Belamcamda and Solomon Seal, which can serve to demonstration the herbs that are in the Chinese herbal formulas that I make.

Next spring should be even better and there will be even more medicinal plants and flowers – including Magnolia, Hollyhock, Fennel, Clematis, Platycodon, and Wild Rose.

I have lots of poppy seeds, let me know if you want some. You can plant them late fall for next spring germination.

Peony – Bai Shao     

IMG_9997 

Aster – Zi Wan

IMG_0940

Belamcamba ( Blackberry Lily) – She Gan

IMG_0280

Chrysanthemum – Ju Hua

IMG_0918

Scutellaria (Skullcap) – Huang Qin

IMG_0380

Poppy – Ying Su Qiao

IMG_0012 IMG_0015

Posted in Chinese Herbal Medicine | Comments closed

Blueberry Crumb Cake

If you have an extra pint of blueberries in your fridge, here’s one of my favorite ever cake recipes. IMG_0554

I made the recipe from Smitten Kitchen’s Blueberry Crumb Cake but increased the chopped walnuts to 3/4 cup and used an 8 inch pan, which increased the cooking time to over an hour.

It gets better as it sits for a couple days, if it lasts long enough.

I’m bringing half on our camping trip, and the other half is going to my friend Rebecca, as a belated birthday treat.  Here’s her half:

IMG_0563


Posted in Desserts, Recipes | Comments closed

Spicy Quick Pickled Cucumbers

2 pounds fresh cucumbers, cut lengthwise into spears (if the cucumbers are big and has big seeds, you can IMG_0425cut out some of the seeds)

¼ cup white wine vinegar or unseasoned rice vinegar

1 t sugar

¾ t crushed red pepper flakes

2 t sea salt, plus more

2 T chopped dill or other herbs (parsley, cilantro, basil – whatever you have/like)

2 T fresh lemon juice

Toss cucumbers in a large bowl with vinegar, sugar, red pepper flakes and 2 t salt. Chill at least 1 hour and up to 6 hours. Rotate once or twice during that time.

Just before serving, add herbs and lemon juice and toss to combine. Taste and season with more salt if needed.

Note: This recipe is not very spicy. It is so quick and easy, and it is nice to be able to make it a couple hours in advance. If you want, use a big mason jar, lay it on its side and rotate.

Thanks to Jeanette Moy for this recipe!

Posted in Healthful Eating, Recipes, Side dishes | Comments closed